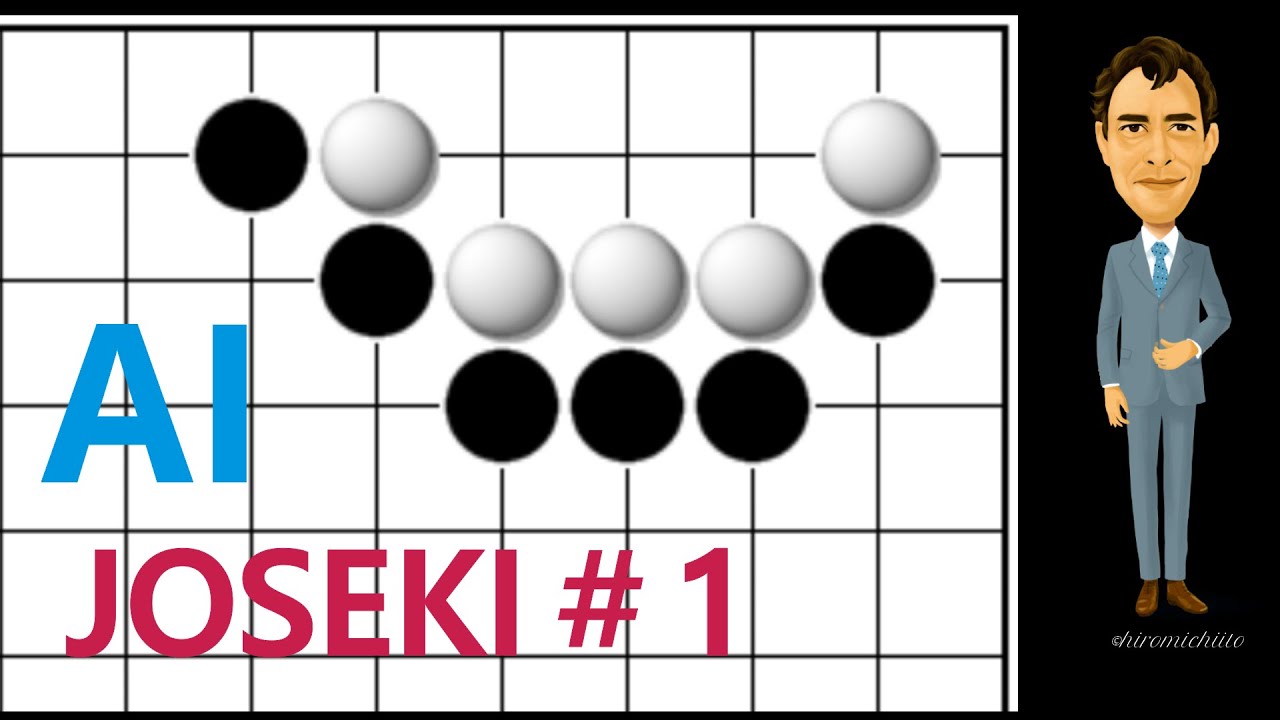
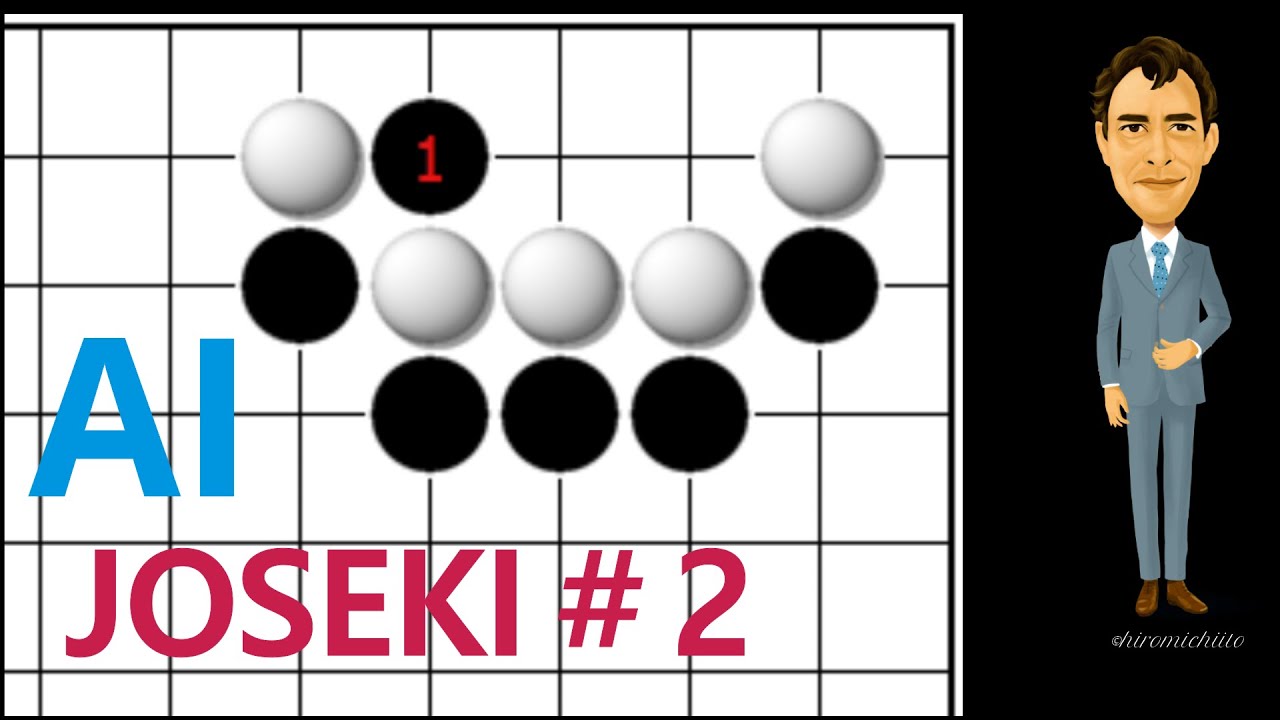
How is move 1 influencing which corner joseki I should pick?
I can tell there is some logic behind it, but I can’t really grasp what it is.
For starters, the difference seems really small. When I ran it through KataGo myself, it prefers the outcome on the right in both cases, and the difference between the two enclosures was only 1/5 point—well within KataGo’s typical margin of error. If I were to speculate about the reasons for the 1/5 point difference, I’d say that the diamond Black gets with moves 6 to 12 is attackable. If White enclosed at O3, Black can stabilize the group on a large scale with R6, which also follows the opening principle of playing the first moves in the corners. On the other hand, if White enclosed at R6, Black has no good local follow-up to stabilize the group.
But at 19k, I would ignore this difference completely.
I thought it would have been something obvious and important. Thanks anyway for the analysis.
It’s quite common to think that something not joseki means a big difference when it’s just a matter of one or two points…
This wasn’t an obvious or important. But I wanted to give you something that might be.

Here, a little later in your game, you approached the 3-3 point at C6. This lost at least 3 points, according to the site AI. There are perhaps two important things you missed here.
First, don’t rush to approach a 3-3 point. A 3-3 point takes territory in the corner and settles it quickly. A 3-3 point can be enclosed, but an enclosure from a 3-3 point is kind of inefficient because the 3-3 point cuts into the corner territory being enclosed. As a result, enclosing a 3-3 point is low priority. And since Black won’t rush to add a move there, neither should White. So you can think of a 3-3 point as a kind of “no man’s land.” You can leave a 3-3 point alone for a shockingly long time without messing up.
Second, you missed the concept described in this Senseis Library article on “focal points”: https://senseis.xmp.net/?FocalPlays In short, a focal point is a key move between two opposing frameworks. And so a move there by either player would expand their framework and dent their opponent’s framework. E13 in your game is a focal point. Compare the two diagrams below and I think you can see what I’m getting at. In the first, Black presses White down in sente and encircles much territory. And in the second, White presses Black down in sente before playing a phenomenal dual-purpose move to erase the benefit of the framework and also enclose a corner.


Oh I wasn’t trying to capture the 3-3. I was just trying to extend my own framework.
One thing that I’ve found interesting in terms of AI review is that when there’s no active fighting, the correct move is a focal point 90% of the time instead of a more typical “big” point that only aims to develop territory. I’ve played moves I consider big numerous times only to have the AI respond in my post-game analysis that the move was a blunder and I should’ve played the focal point instead.
Typically which Joseki is ‘correct’ does depend on what’s going on in other corners of the board, especially when it’s not the first Joseki that’s been played.
This one is probably quite subtle, especially if as Mark suggests, the difference is less than one point on the board. It means that if OGS ran the analysis again, you might not see the same result for the preferred move/variation.
In this case, it is very hard to see how the bottom right corner enclosure factors in. If anything I would imagine Tengen factoring in more so for the Joseki in the first diagram, and it breaks a ladder that white might like to play if black cuts at O16. So there’s some fighting variations there.
The ponnuki black gets in the upper right of the second diagram is almost alive as it is, so it’s not really strongly attackable and there’s a standard pushing sequence, which you can see the start of, the push (White 15 at D14). Maybe white can try to make a couple of extra points on that side by approaching the ponnuki similar to the way black does on the opposite side of the board, and the enclosure on that side helps to map out some territory.
It doesn’t really explain it though.
If you’re interested in getting a feel for when each Joseki might be chosen in real game positions I really enjoy Michael Redmonds videos (below). He goes through the Joseki and then shows example games when they get played. There’s probably more clear cut cases there than here in this game.
Maybe - and remember im only about ~5k so this isnt very strong insight - but i can see the logic of blocking r16 after o3. That enclosure of r4-o3 is facing toward the right side of the board, and white has some potential to make a big “box” on the right side, so it makes sense that white prefers blockin r16 in such case.
But if w plays the enclosure with r6, then its facing toward the bottom side of the board, (where b already has solid stone on c3 so its prolly not gonna grow into anything big), and the potential “box” white could build on the right side is lot smaller than it could be. Maybe this is why w might prefer to block on q17, as its maybe more efficient on preventing black building anything big either toward the top side. Maybe?
But idk, the both results seem about the same, both boards look equally good for white ^^
A ponnuki wants to be played away from, because it is a solid shape. When black gets a ponnuki like in the right-side diagram, black wants to build that side with R6, next.
black wants this r6Reversing this, when white already has a stone at R6, that ponnuki won’t have a good followup, because anything they play on the right side will be overconcentrated(black wont be able to extend as far from their ponnuki as they’d like); therefore white prefers to put black in that position. overcontenrated
When white prefers the left-side joseki, black wants to follow it up with r14 and q12 as last move*, but that leaves the perfect approach open for white at r10, taking an extension from their o3 enclosure. w wants r10
If black has to play a low move like r12 instead of q12 to prevent that approach, white already gained something locally.
As a general principle, ponnuki likes a followup of approaching the far corner on the same side or being left alone. Second diagram takes away one of those options from black already, so white doesnt mind forcing that particular board position.
I’m a little surprised right-side diagram is just 1/5 points worse than a hypothetical diagram with the same ponnuki with white o3 in place. I guess it goes to show how little fuseki matters.
*when white doesn’t have the ladder and white has to play o14 instead of o15, professionals -as black- prefer playing q12 over r12 with a 7/1 ratio, whereas when white has the ladder and can play o15, its 1/1. So, it is safe to say, in this position white wants to play at q12.


